How to Set Up a Gallery for Your AllProWebTools Website
Love showing off what you can do? While an image can show off the quality of your product or service it can also help the consumer feel comfortable trusting in your business. This is why AllProWebTools has the option to have a gallery on your website. The gallery allows you to show potential customers what you can offer while proving to them you are different from your competitors. So if you're ready to take a leap and put it all out there, this is a great place to start!
Managing Your Images
Before creating your gallery, ensure the images you are going to upload are already saved on your computer. To upload the photos into your AllProWebTools account you can follow these simple steps:
- From your dashboard, click the tab for "website" > "Manage Images and Files"
- Next, upload your photos to the console by clicking the "Upload" button
- Drag your files and images from your computer into this box and the upload will begin automatically (Note: once the image is uploaded, a check mark will appear on it)
After you have imported your desired images you may preview, edit the file name, delete, or download them by hovering over the image and selecting one of the options that appear. You may also create folders and drag images into them to stay organized. If you happen to loose an image, you can always find it by selecting a filter or the search bar to search for the name of the image. (Note: Be careful to not move images into folders after they have already been published on a page or in an email. Doing so will break the link to those images.)
Creating Your Gallery
Once you have uploaded all the images you want on your website, follow these steps to create a gallery page to showcase your passion!
- From the dashboard click "website" > "Gallery"
- Click the "Create New Gallery" button
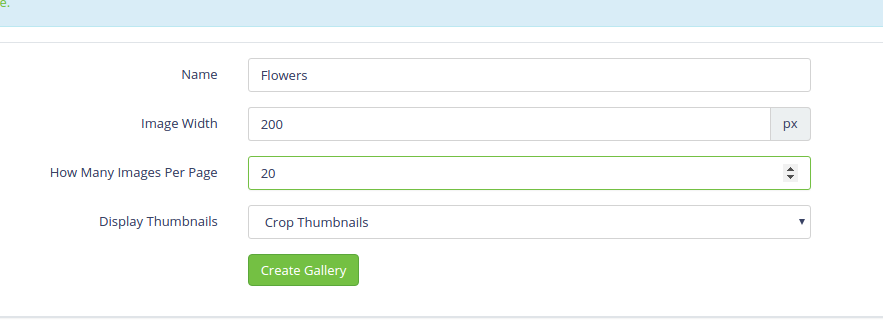
- Enter in a name for your gallery, image width (we recommend 200), your desired number of images per page, and whether to crop or not crop thumbnails (we recommend cropping)
- After you create your gallery, click the green "Add Images to Gallery" button
- You will now see all the images in your gallery. Click to select the ones you want and click the green "Add to Gallery" button at the bottom of the page
Now that the photos are in your gallery you can caption them, delete them, or drag to rearrange the images in a different order.
Building The Gallery Webpage
Since the Gallery you just created is holding all of your photos, it's time to create a page to present them!
- Click "Website" > "My Webpages", then click the green "Create New Page" button
- Name your page then click "Settings" to choose a page layout. We recommend you change the green Menubar option to "show" so that your Gallery will appear as a tab at the top of your website

- To add the Gallery to your page, look at the WYSIWYG formatting editor on your new page and click "Widgets" > "Gallery" to add a widget code. Then click save
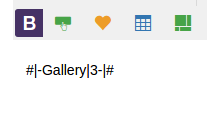
The final step you need to take is to make sure you are showcasing the correct gallery. By default, the widget code will appear with a number 1. Changing this number will cause a different gallery to show up. Here's how:
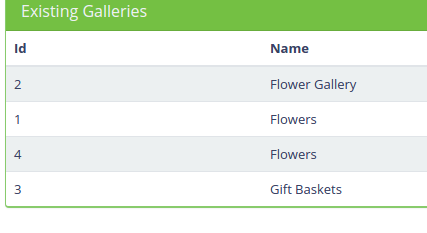
- First, determine what number your gallery is by clicking "Website" > "Gallery" in the menu of your Dashboard
- Locate gallery that you created and take note of the ID number next to that gallery
- Whatever gallery you want to showcase, enter that number in place of the default number "1" in the widget code on the page you created and click "Save"
To check your work, click the "View Site" button and click the tab for the gallery you created. The images will appear and you can hover over them to view the caption you wrote or click on a thumbnail to make the image larger.
Check out our step-by-step tutorial!
Great job! Now all of your talent can be presented for your customers' viewing pleasure. We hope this information can help you build a vibrant gallery to represent your business, but as always you can contact one of our AllPro Experts for help or take a look at our YouTube channel if you have further questions.