Save Time and Convert More Leads by Using Custom Field Options
Wednesday December 13, 2017
When you’re using online marketing to capture leads and make sales, one of the most powerful tools in your arsenal is the ability to send each lead exactly the kinds of offers they want. The more relevant your offer is to them, the more likely they are to buy it instead of tuning you out.
To do this quickly and efficiently, you need to have a system for obtaining and storing information about their preferences and requirements, and accessing it easily when you need it.
In version 4.62 of AllProWebTools, we’ve provided a simple but versatile set of tools you can use to acquire, sort and store all the information you need, so you can give your customers fast service that’s tailored to their desires, and send the most tantalizing offers possible to each of your leads.
How to use Custom Fields in AllProWebTools:
For those of you who prefer videos over text, here’s a 6-minute demo that explains how to use Custom Fields:
If you prefer to read, here’s a quick walk through of the process:
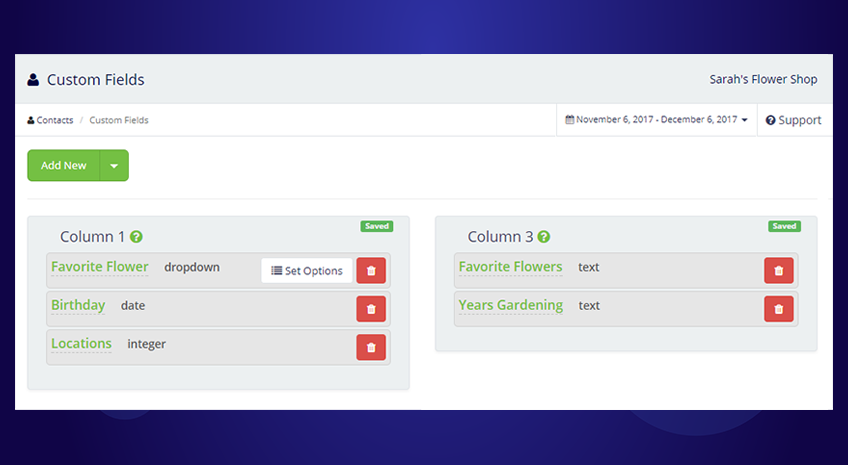
First, hover your mouse over “Contacts” in the navigation sidebar, and a menu will appear. Click on “Custom Fields” in that menu, and it will take you to a page where you can create Custom Fields.
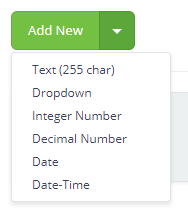
On that page, you can not only choose the Custom Fields you want, but you can also choose what type they are, so they’ll be easier to use. Just click the arrow on the side of the “Add New” button on the upper left to choose what kind of field you’re creating.
For example, if you need to know about your customer’s favorite color, you can create a drop-down menu with color options.
Or, if you need to know the date on which they’ll need your services, you can choose ‘date’. When you go to fill out that field in a contact record, it will generate a small calendar pop-up you can click on to select the date and time, so you don’t have to manually type them in.
You can make creating Custom Fields even easier by getting your leads to do it for you!
If you want to save yourself and your leads some time, rather than having a phone or email conversation to learn about their specific interests, you can have them provide that information when they’re first giving you their email.

If you go to Contacts – Sign-Up Boxes, then click the green “Create New Box” button in the upper left corner, you can create a new sign-up box. On the far right, you’ll see a box called “Custom Inputs”, with a list of the custom fields you’ve created.
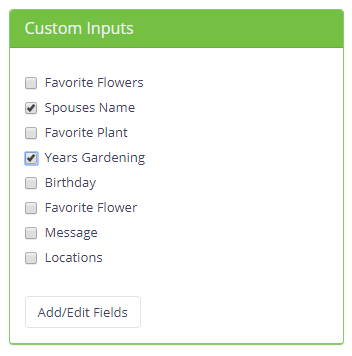
You can choose the information you’ll need to know in order to serve the type of client that lead box is geared toward, like their favorite color, the date of the event, the number of guests, or any other data you’ll require in order to perform the service or provide the product they want.
In the middle box on the “Create New Box” page, you can check the box next to the text that says “Comment Box”. This will enable the lead to include any other information they want to give you to help you serve them better.
Once you’ve finished choosing and inputting all the information you want to have in the lead box, click “save”, and it will take you to a page with the code for your new lead box.
Copy this code onto a page in your website and save the page. Once you’ve done this, the lead box will appear on the page, complete with any custom fields you chose to include, such as drop-down menus, text fields, or date fields with pop-up calendars.
When a lead fills out this lead box, this information will be automatically added to their contact record, and you’ll get a notification so you can quickly follow up and close the sale.
By using these features, you can save yourself hours of phone calls and follow-ups, and easily keep track of all the data you need in order to give your customer tantalizing offers and superior service.

Stephanie O'Brien
Stephanie is a copywriter and business coach. She specializes in helping coaches to create customized client attraction plans and put them into action, and to design lucrative and life-changing group programs, so they can help more people, make more money, and have more free time. She uses AllProWebTools in her business Coach Client Connection.
Categories
Recent Posts
Popular Tags
dns partners allprowebtools app VA twitter crm perceived value certified branding employeesArchives
Subscribe
