Setting Up Your CRM Email Inbox [4.5]
Monday December 19, 2016
Additional Features
Beginning with the introduction of the Workflow Timeline, our intention has been to give YOU the most optimal, up-to-date data for YOUR business. The Timeline was the first step in this direction, and to augment it, we're introducing the CRM Email Inbox.
After setting this WebTool up, you'll see every email interaction with your customers displayed on your Timeline AND the individual note sections for each contact record. You will also be able to respond to these emails from within your Timeline or the client's contact record. While this WebTool doesn't eliminate the need for a separate inbox (yet), it does offer a higher level of convenience and increase the efficiency of your small business CRM.
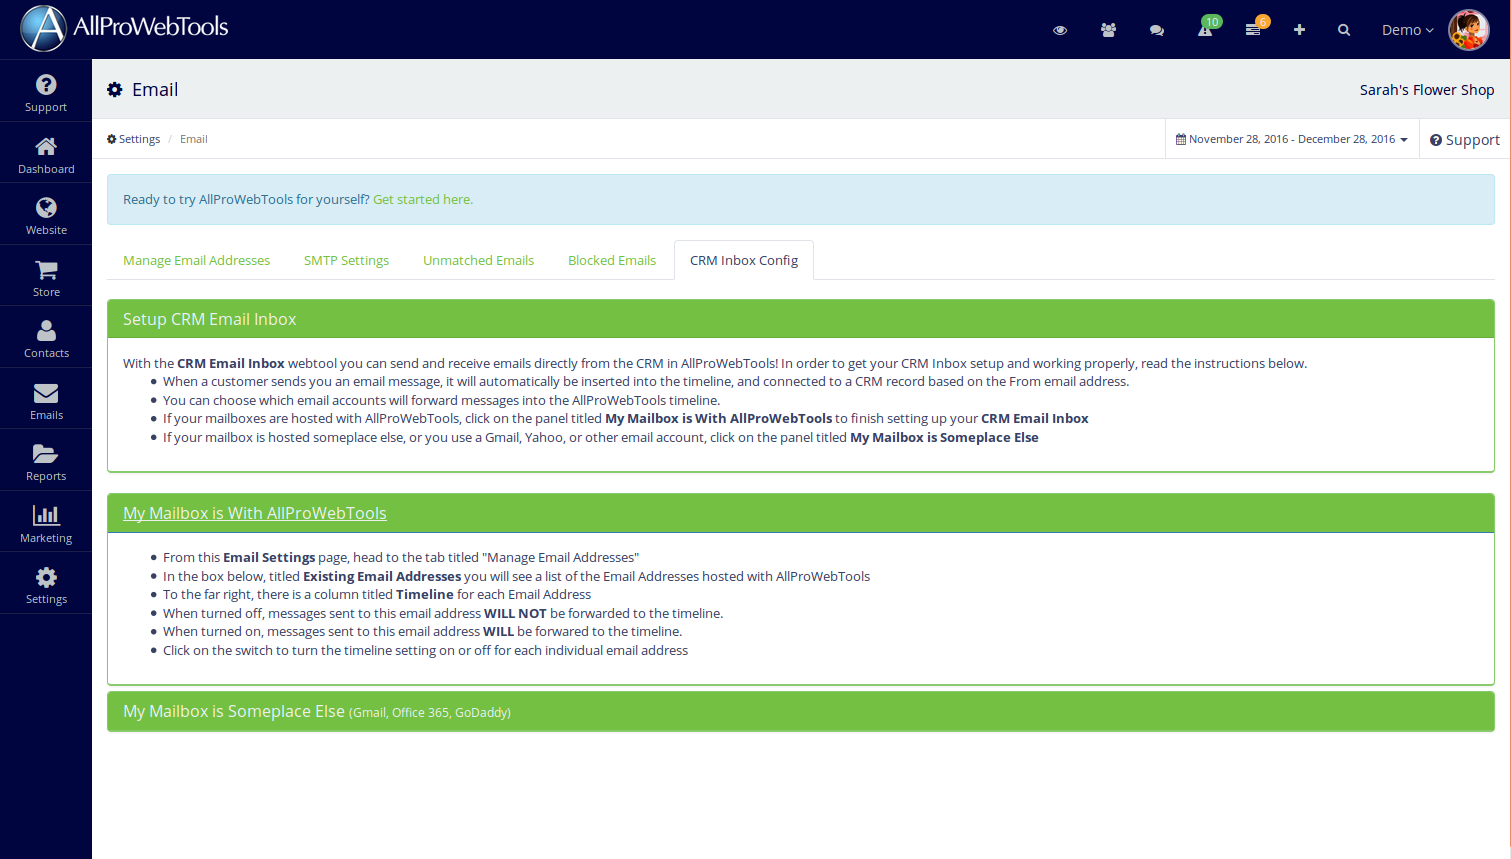
How do I set up the CRM Email Inbox?
Before getting started, you'll need to add the WebTool
You can do this by going to Settings → WebTools → Available WebTools → CRM Email Inbox → Click "Add"
Part 1 - Inbound Emails
You actually have two options to choose from when setting up Inbound Emails. You will need to determine whether you want to continue using an external Mailbox (such as Gmail, Yahoo, Outlook, etc.) or have AllProWebTools host your Mailbox.
If your Mailbox is hosted someplace else:
- Go to Settings → Email → Click on the CRM Inbox Config tab
- Click on the "My Mailbox is Someplace Else" option
- Copy the code given to you → Go to the appropriate settings in your Mailbox and set it to forward all incoming emails to that code
- You should be all set! Any emails you receive will now show up in the Workflow Timeline
Alternatively, you have the option to create a new email address with AllProWebTools:
*IMPORTANT*: Having a Mailbox hosted with AllProWebTools is part of the base package and doesn't cost you anything extra! The only prerequisite to getting started is making sure your website is hosted with AllProWebTools, and has already gone live!
- Go to Settings → Email
- Watch these videos on setting up your Mailbox with AllProWebTools before continuing any further
- Once that's done, go ahead and enter an email address that you'd like, as well as your password. You also have the option to forward any incoming emails to this address to a different one. Hit save when you're done
- Once that's finished, scroll down to the Existing Email Addresses box. This is where you can view all of the emails you've created. Make sure that the "Timeline" option for each of the addresses is set to "On"
- You're all done with Part 1! You will now receive emails sent to any emails in the Existing Email Addresses box in your Workflow Timeline!
Part 2 - Outbound Emails
- Go to Settings → Company Information → Contact Email
- By filling out this field, you'll be entering the Company's email address that you want your customers to receive emails from, as well as reply to. This is usually kept separate from a personal company address. For example, this field should be [email protected] rather than thomas@sarahsflowershop.com
- Once that's done, go to Settings → Users → Find your own user profile
- Edit the email address field on this page to reflect your personal company email (i.e. thomas@sarahsflowershop.com)
- You are all set up now! Once you go into any contact record in your small business CRM, you will see a "New Email" option. Click on this to send the contact an email straight from your small business CRM! You will be able to choose between the company's main email address, as well as your personal company address when sending out emails.
Video Tutorial
For the more visually inclined, we also have a video tutorial for setting up the CRM Email Inbox!
- In Settings → Email Settings, click on the "Unmatched Emails" tab at the top of the screen. This feature allows you to see all of the emails you received, that were NOT attached to an existing CRM record. You can read the email by clicking on it, as well as assign it to an existing CRM record if you discover the sender already has one.
- Next to Unmatched Emails, is the Blocked Emails tab. Adding any email address here will prevent them from showing up in the timeline. From this screen you can unblock anyone to restore emails from them to the Workflow Timeline.
Please keep in mind, since this feature is currently in its infancy, it has temporary shortcomings (such as: the inability to CC people). As more people begin to use this feature, we will take into consideration user suggestions and needs to vastly improve it.
Love this feature and want to help us improve it? Leave your suggestions on our forum!

Elijah Mendonca
Usually going by "Shiva Mendonca" or "the coolest guy ever," Elijah is an Interactive Media Design: Video Game Design graduate from Becker College, MA. Having moved to Fort Collins, CO on a whim after graduation, he spends his free time sleeping, eating, writing, exploring the natural beauty of Colorado, eating, and sleeping (in that order).
His other interests include listening to music (metal), rock climbing, crossword puzzles, playing squash, swimming, hiking, and cycling. Read more of his work on the facebook page Shiva Mendonca - Author.
Find on Google+Categories
Recent Posts
Popular Tags
connie kercher Social Reach first day email reports switchboard taxanista social media new business opportunity job interviewArchives
Subscribe
