How To Set Your Follow-Up Reminders in Google Calendar
Monday July 31, 2017
Do you need help scheduling time sensitive events directly to your Google Calendar? You can contact one of our Experts to help you set this up, or follow the steps below to set it up for yourself.
Scheduling appointments may have been an issue in the past, but now with AllProWebTools' Google Integration you can add appointments or follow-up reminders directly to your Google Calendar! As a small business ourselves, we understand that your days become busier as you grow, and the need for organization is essential. AllProWebTools is here to show you how to take advantage of your own personal receptionist.
Connecting your Google Calendar
Now that we have this handy feature for you and your business, I want to explore with you how to set a follow-up appointment with one of your contacts. Before we begin, it is important to make sure you have already added the required WebTools and connected your Google calendar to your account. If you have not yet done so please see the following video to learn how to add the appropriate WebTools.
Follow-Up Reminders
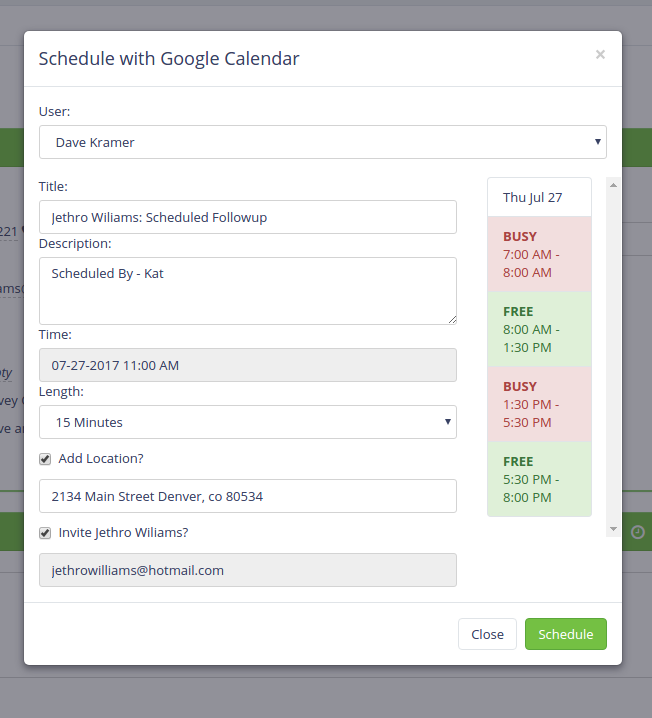
Now that you have added the required WebTools and connected your calendars you can begin the simple process of creating a follow-up reminder.
- From the dashboard of your AllProWebTools account, find the magnifying glass at the top right of the page. Click on this icon to search for the client by name.
- Once you are on the client's information page you will see the account insight box to the right of the page.
- Next, set the "Account Manager". This will be the staff member (if not yourself) who will follow up with the client.

- Select the follow-up time and date that will work best for the account manager and your client.
- After specifying your desired time and date, click the calendar icon. A box will appear showing an hourly view of that day's time slots. Time slots that are green are available and time slots that are red are full.
- Once you have ensured the desired time slot is available you can add notes about the follow-up such as :
- What the follow-up entails
- Confirm whether this will be a video, phone, or email follow-up
- If the follow-up is in person you may add the location by checking the "Add Location" button.
- Finally, click the "Invite" button at the bottom.
This button is very important! It is going to allow you to automatically send an email to the corresponding client. Yep, that means that your client is going to receive a calendar invite of this scheduled appointment!
After you click the Schedule button you won't have to worry about this appointment again until it appears in your Google calendar (also appears in your AllProWebTools account) for the assigned day. For more information about how AllProWebTools and Google Calendar can benefit your business today click here!
Need some help setting up your follow-up reminders? Contact an Expert for help.


Kat Webster
Categories
Recent Posts
Popular Tags
marketing budget routing memberships salesforce features funny stories startups small business cherie saasArchives
Subscribe
